TryHackMe(THM):MAL: Malware Introductory
目次
- Task 1 What is the Purpose of Malware Analysis?
- Task 2 Understanding Malware Campaigns
- Task 3 Identifying if a Malware Attack has Happened
- Task 4 Static Vs. Dynamic Analysis
- Task 5 Discussion of Provided Tools & Their Uses
- Task 6 Connecting to the Windows Analysis Environment (Deploy)
- Task 7 Obtaining MD5 Checksums of Provided Files
- Task 8 Now lets see if the MD5 Checksums have been analysed before
- Task 9 Identifying if the Executables are obfuscated / packed
- Task 10 What is Obfuscation / Packing?
- Task 11 Visualising the Differences Between Packed & Non-Packed Code
- Task 12 Introduction to Strings
- Task 13 Introduction to Imports
- Task 14 Practical Summary
この記事は、DeepL翻訳を利用して和訳しています。
Task 1 What is the Purpose of Malware Analysis?
Malware is such a prevalent topic within Cybersecurity, and often an unfortunately recurring theme among global news today.
マルウェアは、サイバーセキュリティの分野では非常に一般的なトピックであり、残念ながら今日の世界的なニュースの中でも繰り返し取り上げられているテーマです。
Not only is malware analysis a form of incidence response, but it is also useful in understanding how the behaviours of variants of malware result in their respective categorisation. This room will be a practical introduction to the techniques and tools used throughout malware analysis - albeit brief, I hope to expand on these techniques a lot more in-depth within the future.
マルウェア解析は、インシデンスレスポンスの一形態であるだけでなく、マルウェアの亜種の挙動がどのように分類されるかを理解するのにも役立ちます。この部屋では、マルウェア解析で使用されるテクニックやツールを実践的に紹介します。簡単ではありますが、将来的にはこれらのテクニックをより深く掘り下げていきたいと考えています。
When analysing malware, it is important to consider the following:
マルウェアを分析する際には、以下の点を考慮することが重要です。
- Point of Entry (PoE) I.e. Was it through spam that our e-mail filtering missed and the user opened the attachment? Let's review our spam filters and train our users better for future prevention!
Point of Entry (PoE) 例:スパムメールでフィルタリングが失敗して、ユーザーが添付ファイルを開いてしまったのではないか?スパムフィルターの見直しとユーザーの教育を行い、今後の対策につなげましょう。
- What are the indicators that malware has even been executed on a machine? Are there any files, processes, or perhaps any attempt of "un-ordinary" communication?
マルウェアがマシン上で実行されたことを示す指標は何か?ファイルやプロセス、あるいは "普通ではない "通信の試みはないか?
- How does the malware perform? Does it attempt to infect other devices? Does it encrypt files or install anything like a backdoor / Remote Access Tool (RAT)?
そのマルウェアはどのように動作しますか?他の機器への感染を試みていますか?ファイルを暗号化したり、バックドアやリモートアクセスツール(RAT)などをインストールしたりしていますか?
- Most importantly - can we ultimately prevent and/or detect further infection?!
最も重要なのは、最終的に感染を予防・発見できるかどうかです。
Task 2 Understanding Malware Campaigns
Despite the many variants of malware, attacks can generally be classified into two types: Targeted and Mass Campaign.
マルウェアにはさまざまな種類がありますが、攻撃は一般的に2つのタイプに分類されます。「ターゲット型」と「マスキャンペーン型」です。
Targeted
A "Targeted" attack is just that - targeted. In most cases, malware attacks that occur this way are created for a specific purpose against a specific target. A great example of this type of purpose could be the DarkHotel malware, whom is designed to steal information such as authentication details from government officials.
「標的型」の攻撃は、まさに「標的型」です。多くの場合、このような攻撃を行うマルウェアは、特定のターゲットに対して特定の目的のために作成されます。例えば、政府関係者の認証情報などを盗むことを目的としたマルウェア「DarkHotel」は、このような目的で作られています。
Mass Campaign
On the other hand, the "Mass Campaign" classification can be akin to many real life examples, and is the most common type of attacks. The entire purpose of this type of Malware is to infect as many devices as possible and perform whatever it may - regardless of target.
一方、「マス・キャンペーン」の分類は、多くの実例に類似しており、最も一般的な攻撃のタイプです。このタイプのマルウェアの目的は、ターゲットを問わず、できるだけ多くのデバイスに感染し、あらゆることを実行することです。
Companies such as Kaspersky to name one, track these campaigns (known as Advanced Persistent Threats (APTs) and often report on their infection rate and indicators, much akin to the real-life spread of a virus from the World Health Organisation (WHO).
カスペルスキーなどの企業は、これらのキャンペーン(APT(Advanced Persistent Threats)と呼ばれる)を追跡し、その感染率や指標を報告していますが、これは世界保健機関(WHO)による現実のウイルスの拡散によく似ています。
Kaspersky report on the "Crouching Yeti (Energetic Bear)" campaign, this campaign specifically targets the following:
カスペルスキー社のレポートによると、「Crouching Yeti (Energetic Bear)」キャンペーンがあり、このキャンペーンは特に以下をターゲットにしています。
- Industrial/machinery (工業・機械)
- Manufacturing (マニュファクチャリング)
- Pharmaceutical (製薬)
- Construction (建設業)
- Education (教育)
- Information technology (情報技術)
Whilst it this variant is technically targeted, there is a rather large scope of this variant of malware, and as such, can be considered as a "Mass Campaign" attack.
このマルウェアは技術的には標的型ですが、このマルウェアの範囲はかなり広く、「マスキャンペーン」攻撃と考えられます。
What is the famous example of a targeted attack-esque Malware that targeted Iran?
イランを狙った標的型攻撃的なマルウェアの有名な例を教えてください。
Google「イラン」と「標的型」で検索すれば答えが出ます。
What is the name of the Ransomware that used the Eternalblue exploit in a "Mass Campaign" attack?
Eternalblueエクスプロイトを使用して「マス・キャンペーン」攻撃を行ったランサムウェアの名称は何ですか?
Google「Eternalblue」と「エクスプロイト」で検索すれば答えが出ます。
Task 3 Identifying if a Malware Attack has Happened
Much like any interaction with an Operating System, there is always remnants of such activity even if there is little trace...
OSとのやりとりのように、たとえ痕跡がほとんどなくても、そのような活動の痕跡は常にあります。
Unfortunately, malware (dependant on its variant) is largely obtrusive - in the sense that it leaves quite an extensive papertrail of evidence...Perfect for us analysers!
残念なことに、マルウェアは(その種類にもよりますが)目障りなものが多く、広範囲に渡って証拠の紙片を残していくという意味で、我々分析者にとっては最適なものなのです。
The ultimate process of a malware attack can be broken down into a few broad steps:
マルウェア攻撃の最終的なプロセスは、いくつかの大まかなステップに分けられます。
- Delivery (デリバリー)
- Execution (実行)
- Maintaining persistence (not always the case!) (永続性の維持(必ずしもそうとは限らない!?)
- Propagation (not always!) (プロパゲーション(常にではありませんよ))
These steps will generate lots of data. Namely: network traffic such as communicating with hosts, file system interaction like read/writes and modification.
(これらのステップは、多くのデータを生成します。例えば、ホストとの通信などのネットワークトラフィック、読み書きや変更などのファイルシステムのインタラクションなどです。)
Malware is essentially classified based upon the behaviours it produces to perform the steps listed above. For a famous example, Wannacry performs all four of these steps.
マルウェアは基本的に、上記のステップを実行するために生成される動作に基づいて分類されます。有名な例では、Wannacryがこれらの4つのステップをすべて実行します。
1.Delivery (デリバリー)
This could be of many methods, to name a few: USB (Stuxnet!), PDF attachments through "Phising" campaigns or vulnerability enumeration.
これには様々な方法がありますが、いくつか例を挙げてみましょう。USB(Stuxnet!)、"Phising "キャンペーンによるPDFの添付ファイル、脆弱性の列挙などです。
2.Execution (実行)
Here's the main part of how we classify Malware. What does it actually do? If it encrypts files - it's Ransomware! If it records information like keystrokes or displays adware - we can classify it as Spyware.
ここでは、マルウェアの分類方法のメインとなる部分を紹介します。マルウェアが実際に何をするか?ファイルを暗号化するものは「ランサムウェア」です。キー操作などの情報を記録したり、アドウェアを表示したりするものは、スパイウェアに分類されます。
We only understand this stage through analysing the sample, which is why analysis is important - and is what we'll be covering.
この段階では、サンプルを分析して初めて理解できるので、分析が重要であり、今回取り上げるのもそのためです。
3.Maintaining persistence (not always the case!) (永続性の維持(必ずしもそうとは限らない!?)
It wouldn't make much sense for Malware authors to go through all the trouble of developing a piece of code that is capable of execution - just for it to execute and that's it...Gone. Unless you have a very specific agenda (Cerber).
マルウェアの作者は、実行可能なコードを開発するのに苦労しても、実行して終わりにするだけではあまり意味がありません。よほど特殊な意図を持っている場合は別ですが(Cerber)。
I have submitted an extensive report on this specific Malware, amongst others for a University Module on Malware Analysis...however I will wait for it to be marked before sharing.
私は、大学のマルウェア分析モジュールのために、この特定のマルウェアに関する広範なレポートを提出しました。
Imagine a keylogger has been installed, but you then restart your Computer 30 seconds later. Unless you've entered a lot of sensitive information in 30 seconds - that'll be of no use to the author.
キーロガーがインストールされていて、30秒後にコンピュータを再起動したとします。30秒の間に多くの機密情報を入力していなければ、作者にとっては何の役にも立ちません。
4.Propagation (プロパゲーション)
This stage is largely why Malware is so "noisy", Malware employs many techniques, of which we'll be covering in-depth much later on. Essentially, this stage is just to make sure that the "execution" is worth its while.
マルウェアが「うるさい」と言われるのは、主にこの段階のためです。マルウェアは多くの技術を採用していますが、その詳細については後ほど説明します。基本的に、この段階は「実行」に価値があるかどうかを確認するためのものです。
5. Propagation (伝播)
Hey...If you can infect one device, why not infect more whilst you're at it? Again, this is another reason why Malware can be so noticeable. Host discovery generates a lot of network traffic, we'll come to this later.
1台のデバイスに感染させることができるなら、もっと多くのデバイスに感染させることができるはずです。繰り返しになりますが、これがマルウェアが目立ってしまうもう一つの理由です。ホストの発見は、多くのネットワークトラフィックを発生させますが、これについては後述します。
In Summary, there are two categories of fingerprints that malware may leave behind on a Host after an attack:
要約すると、マルウェアが攻撃後にホスト上に残すフィンガープリントには2つのカテゴリーがあります。
Host-Based Signatures ホストベースのシグネチャー
These are generally speaking the results of execution and any persistence performed by the Malware. For example, has a file been encrypted? Has any additional software been installed? These can are two of many, many host-based signatures that are useful to know to prevent and check against further infection.
これらは、一般的に言えば、マルウェアが実行した結果と、実行後の持続性です。例えば、ファイルが暗号化されたか?何か追加のソフトウェアがインストールされたか?これらは、さらなる感染を防ぎ、チェックするために知っておくと便利な、数多くあるホストベースのシグネチャのうちの2つです。
Network-Based Signatures ネットワークベースのシグネチャー
At an overview, this classification of signatures are the observation of any networking communication taking place during delivery, execution and propagation. For example, in Ransomware, where has the Malware contacted for Bitcoin payments?
このシグネチャの分類は、配信、実行、伝播の際に行われるネットワーク通信を観察するものです。例えば、ランサムウェアの場合、マルウェアがビットコインの支払いのためにどこに連絡したか?
Such as in the case of Wannacry, looking for a large amount of "Samba" Protocol communication attempts is a great indication of infection due to its use of "Eternalblue".
例えば、Wannacryの場合、「Eternalblue」を使用していることから、「Samba」プロトコルの通信試行回数が多いことが感染の大きな目安となります。
Name the first essential step of a Malware Attack?
マルウェア攻撃の最初の重要なステップの名前は?
この設問は上の文書を読めば答えが出ます。
Now name the second essential step of a Malware Attack?
さて、マルウェア攻撃の2つ目の重要なステップは何でしょうか?
この設問も上の文書を読めば答えが出ます。
What type of signature is used to classify remnants of infection on a host?
ホスト上の感染の残骸を分類するために使用されるシグネチャの種類は?
この設問も上の文書を読めば答えが出ます。
What is the name of the other classification of signature used after a Malware attack?
マルウェアの攻撃後に使用されるもう一つのシグネチャの分類名は何ですか?
この設問も上の文書を読めば答えが出ます。
Task 4 Static Vs. Dynamic Analysis
There are two categories used when analysing malware, these are:
マルウェアの分析には、2つのカテゴリーがあります。
- Static Analysis (静的解析)
- Dynamic Analysis (動的解析)
Whilst the methods and tools used for these two categories are vastly different, they are essential in compositing an understanding of how a malware behaves.
この2つのカテゴリーで使用される手法やツールは大きく異なりますが、マルウェアの挙動を理解するためには欠かせないものです。
Static Analysis.
At its brief, "Static Analysis" is used to gain a high-level abstraction of the sample - it can be fairly simple to decide if a piece of code is "malicious" or not with this method alone (but not always, this will be discussed later...). At its core, this method is of the analysis of the sample at the state it presents itself as, without executing the code.
簡単に言えば、「静的解析」は、サンプルの高レベルの抽象化を得るために使用されます。この方法だけで、コードの一部が「悪意のある」ものかどうかをかなり簡単に判断することができます(ただし、必ずしもそうではありませんが、これについては後述します)。この方法の核心は、コードを実行せずに、サンプルの状態を分析することにあります。
Employing the use of techniques such as signature analysis via checksums means quick, efficient (albeit extremely brief) and safe analysis of malware.
チェックサムによるシグネチャ解析などの技術を採用することで、マルウェアを迅速かつ効率的(極めて短時間ではあるが)に、そして安全に解析することができる。
Dynamic Analysis
This step is a lot more involved, and is where the abstraction of the sample is largely built upon. "Dynamic Analysis" essentially involves executing the sample and observing what happens. This of course is not safe. If the sample turns out to be "Ransomware" - you've now lost your files. If it is capable of propagating via traversing a network, nice...You've now just infected your Local Area Network (LAN).
このステップは、より複雑で、サンプルの抽象化が大きく影響するところです。"動的解析 "では、基本的にサンプルを実行して何が起こるかを観察します。もちろん、これは安全ではありません。サンプルが「ランサムウェア」であることが判明した場合、ファイルを失ってしまいます。また、ネットワークを経由して伝播するものであれば、いいですね...ローカルエリアネットワーク(LAN)に感染したことになります。
Please note that these are extremely simplistic explanations of these techniques, there is a lot more involved which we will go throughout this series.
これらのテクニックは非常に単純な説明であり、このシリーズで説明するように、もっと多くのことが含まれていることに注意してください。
I understand the two broad categories employed when analysing potential malware!
潜在的なマルウェアを分析する際に採用される2つの大まかなカテゴリーを理解しました。
Task 5 Discussion of Provided Tools & Their Uses
You will see that some tools will overlap between Static and Dynamic analysis:
静的解析と動的解析の間に重複するツールがあることがわかります。
Provided Static Analysis Tools:
提供される静的解析ツール
C:\Users\Analysis\Desktop\Tools\Static\PE Tools
-
Dependency Walker (depends) ディペンデンシーウォーカー(依存)
-
PeID
-
PE Explorer
-
PEview
-
ResourceHacker
C:\Users\Analysis\Desktop\Tools\Static\Disassembly
-
IDA Freeware
- WinDbg
C:\Users\Analysis\Desktop\Tools\Sysinternalsuite
- ResourceHacker
C:\Users\Analysis\Desktop\Tools\Dynamic
The tools listed here will be used for future tasks, as they involve debugging which is currently out-of-scope for this room...However, will be explored later within the series.
ここに掲載されているツールは、今後の作業で使用することになります。というのも、これらのツールにはデバッグが含まれており、現時点ではこの部屋の対象外となっているからです。
Lets proceed
進めてみましょう
Task 6 Connecting to the Windows Analysis Environment (Deploy)
Whilst malware has been known to traverse (spread) over RDP, in this instance, any and all samples on here are not capable of doing so - nor are they capable of performing any destructive action.
マルウェアがRDPを介してトラバース(拡散)することは知られていますが、この例では、ここに掲載されているすべてのサンプルにはそのような機能はなく、破壊的な動作を行うこともできません。
This series will teach you the practical knowledge and tool familiarity to allow you to transfer these skills to actual samples if you wish too, outside of TryHackMe
このシリーズでは、TryHackMe以外でも、必要に応じて実際のサンプルにこれらのスキルを移すことができるように、実践的な知識とツールの知識を学びます。
With this being a Windows instance specifically, alongside the additional tools and tasks it has to execute, please expect up to wait up towards 10 minutes before being able to access your instance. The average deploy to login took about 7 minutes. Also, please note that the Host will not respond to pings - only the (Remote Desktop Protocol) RDP protocol (3389)
Windowsインスタンスのため、追加のツールやタスクを実行する必要があるため、インスタンスにアクセスできるようになるまで10分程度かかることが予想されます。ログインまでの平均的な展開時間は約7分でした。また、ホストはPingには反応せず、RDPプロトコル(3389)にのみ反応することに注意してください。
Credentials:
You can either connect via RDP (connect to our network first via OpenVPN), or control the machine in browser (no connection required). Please note that this Windows "Instance" will take atleast 5 minutes to fully boot - please be patient. You can view the progress via the progress-bar within the display above.
RDPで接続する(OpenVPNでネットワークに接続する)か、ブラウザでマシンを操作する(接続は不要)ことができます。なお、このWindows「インスタンス」は完全に起動するまでに少なくとも5分かかりますので、しばらくお待ちください。上の画面に表示されているプログレスバーで進行状況を確認できます。
MACHINE_IP
Username: analysis
Password: Tryhackme123!
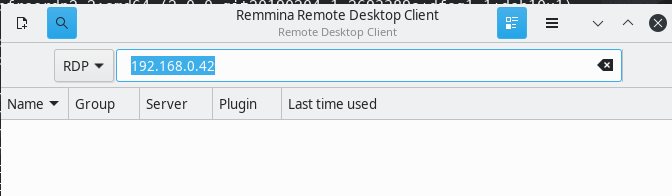
- Default Remote Desktop Terminal, replace the IP Address with your <$IP>

既定のリモート・デスクトップ・ターミナル(IPアドレスをお使いのマシンのIPに置き換えてください)。
Linux: Any compatible RDP client such as Remmina: sudo apt-get install remmina
Again, replacing the IP address with your <$IP>
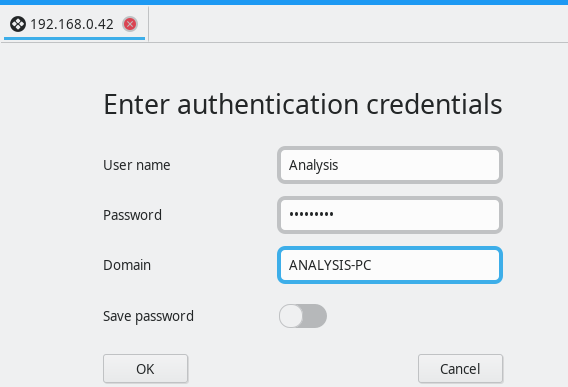
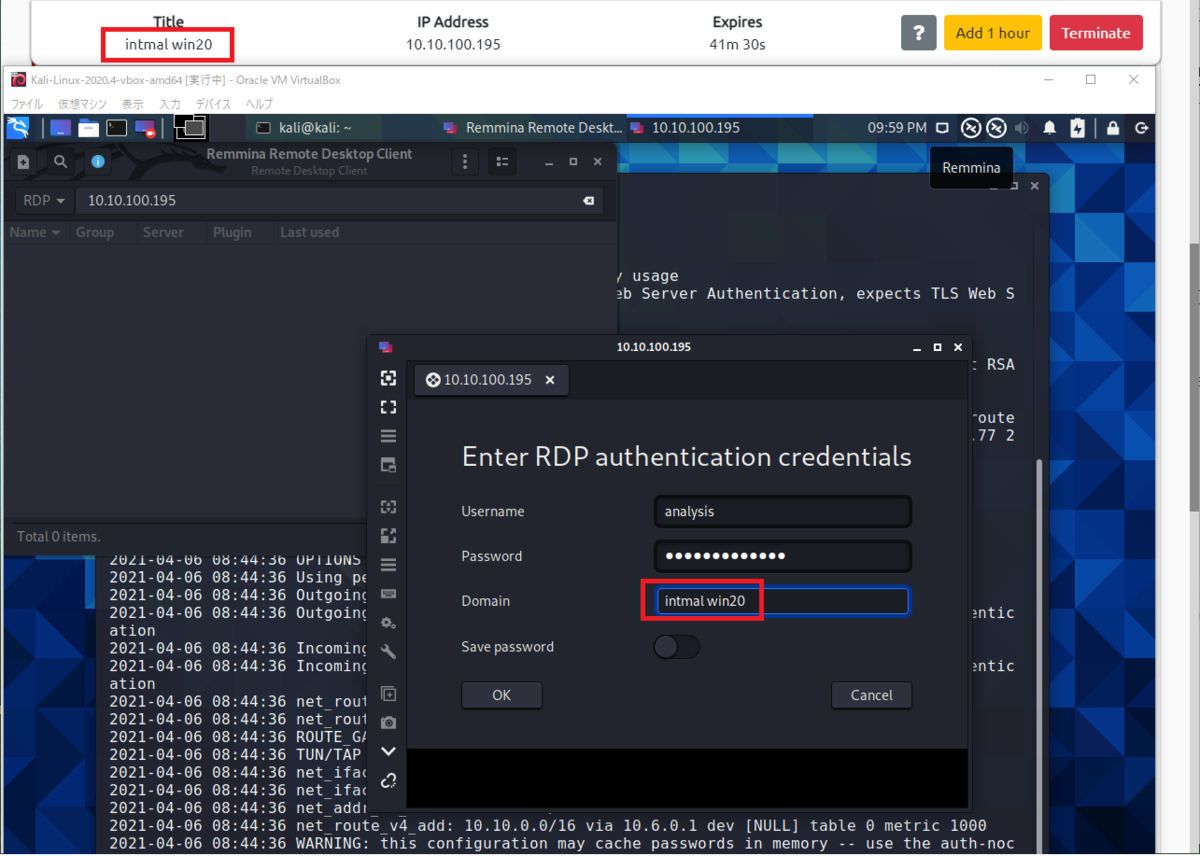
ドメイン名は[Start Machine]ボタンを押下時の「Title」に表示された名前を入力します。
I've logged in!
Task 7 Obtaining MD5 Checksums of Provided Files
MD5 "Checksums" are a prominent attribute in the malware Community. Because there can be many variants of a family of Ransomware, these MD5 "Checksums" are cryptographic "fingerprints" of the files. This allows a uniformed identification throughout the community - especially with automated Sandboxes.
MD5 "チェックサム "は、マルウェアのコミュニティにおいて重要な属性です。ひとつのランサムウェア・ファミリーには多くの亜種が存在するため、MD5「チェックサム」はファイルの暗号化された「指紋」となります。これにより、特に自動化されたサンドボックスでは、コミュニティ全体で統一された識別が可能になります。
For example, say you have 20 files of unknown origin, you are able to identify their genus using their MD5 sum against websites such as Virustotal, if that MD5 "Checksum" has been previously analyzed - removing all the legwork for us!
例えば、出所不明のファイルが20個あったとすると、VirustotalなどのウェブサイトでMD5の「チェックサム」が解析されていれば、そのMD5の和を使って属人性を特定することができますが、私たちにはそのような手間はありません。
Navigate to the "Tasks" Folder on the Desktop, and then enter the "Task 7" Directory, where there will be three files:
デスクトップの「タスク」フォルダに移動し、「タスク7」ディレクトリに入ると、3つのファイルがあります。
- aws.exe
- NetLog.exe
- vlc.exe
Sure, these are common names of executables, but anyone can name an executable as whatever they like! Just because it says "vlc" doesn't mean it is indeed the VLC application! This is where identifying their MD5 Checksum is useful, as no matter the name - their MD5 reveals its true identity.
確かに、これらは実行ファイルの一般的な名前ですが、誰もが実行ファイルに好きな名前を付けることができます。vlc "と書かれていても、それが本当にVLCアプリケーションであるとは限りません。そこで、MD5 Checksumを確認することが有効です。名前に関係なく、MD5が正体を明らかにします。
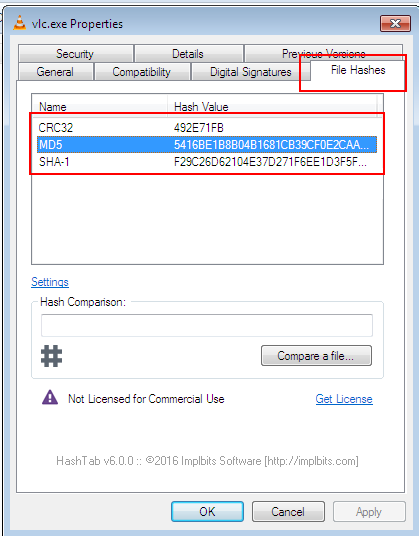
I have installed the "HashTab" application, which calculates a files MD5 sum - amongst others, directly within Windows Explorer as if you were inspecting its properties...
HashTab "というアプリケーションをインストールしました。このアプリケーションは、ファイルのMD5サムなどを計算し、Windowsのエクスプローラーで、あたかもファイルのプロパティを確認しているかのように表示します。
Your Task:
Identify the MD5 Checksums of the three files provided in "Task 7" (You can use Ctrl + C & Ctrl + V over RDP)
「タスク7」で提供された3つのファイルのMD5チェックサムを確認する(RDP上でCtrl + CとCtrl + Vを使用することができます)。
各ファイルで[右クリック]-[プロパティ]を選択します。
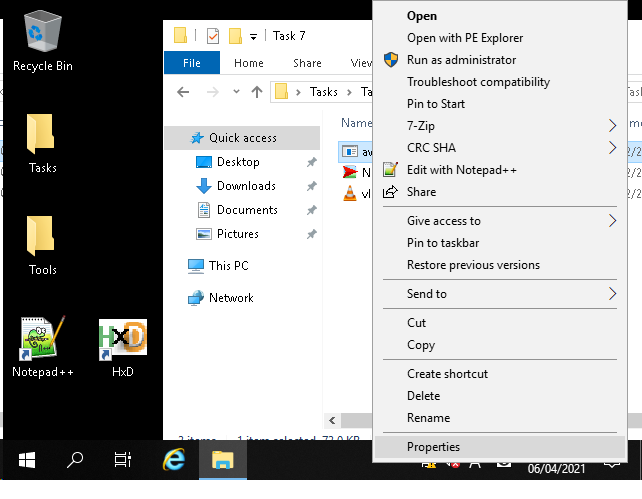
「File Haches」タブをクリックします。 タブの真ん中あたりにある「Setting」をクリックします。
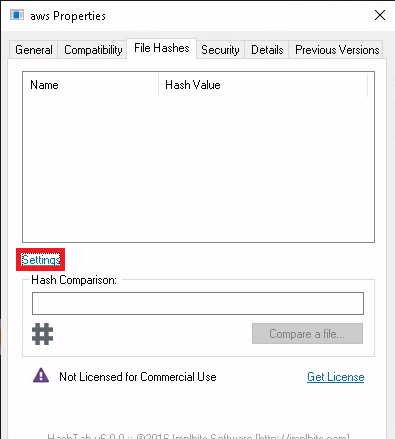
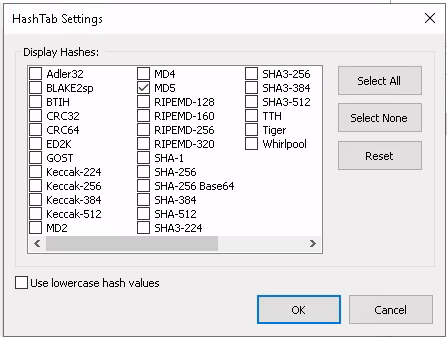
「HachTab Settings」画面上にある「MD5」にチェックを入れて[OK]ボタンを押下します。
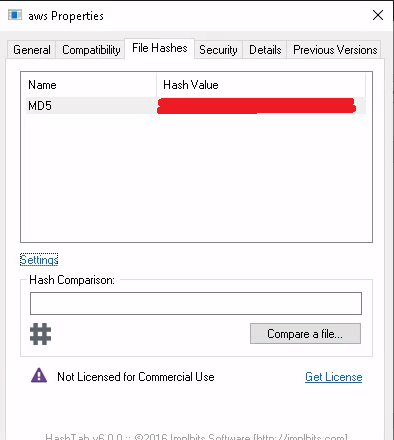
ハッシュ値が表示されます。
The MD5 Checksum of aws.exe
The MD5 Checksum of Netlogo.exe
The MD5 Checksum of vlc.exe
3問とも上記の方法で答えを抽出できます。
Task 8 Now lets see if the MD5 Checksums have been analysed before
Outside of the Remote Windows Environment i.e. Kali or your Windows PC, look up those MD5 "Checksums" on Virustotal to solve this task:
Kali や自分の Windows PC などのリモート Windows 環境以外では、Virustotal で MD5 の「チェックサム」を調べて、このタスクを解決してください。
Does Virustotal report this MD5 Checksum / file aws.exe as malicious? (Yay/Nay)
VirustotalはこのMD5 Checksum / file aws.exeを悪意のあるものとして報告していますか?(Yay/Nay)
Virustotal にアクセスし、[SEARCH]タブをクリックします。
Task7で取得したaws.exeファイルのMD5の値をCopy&Pastして実行キーを押下します。
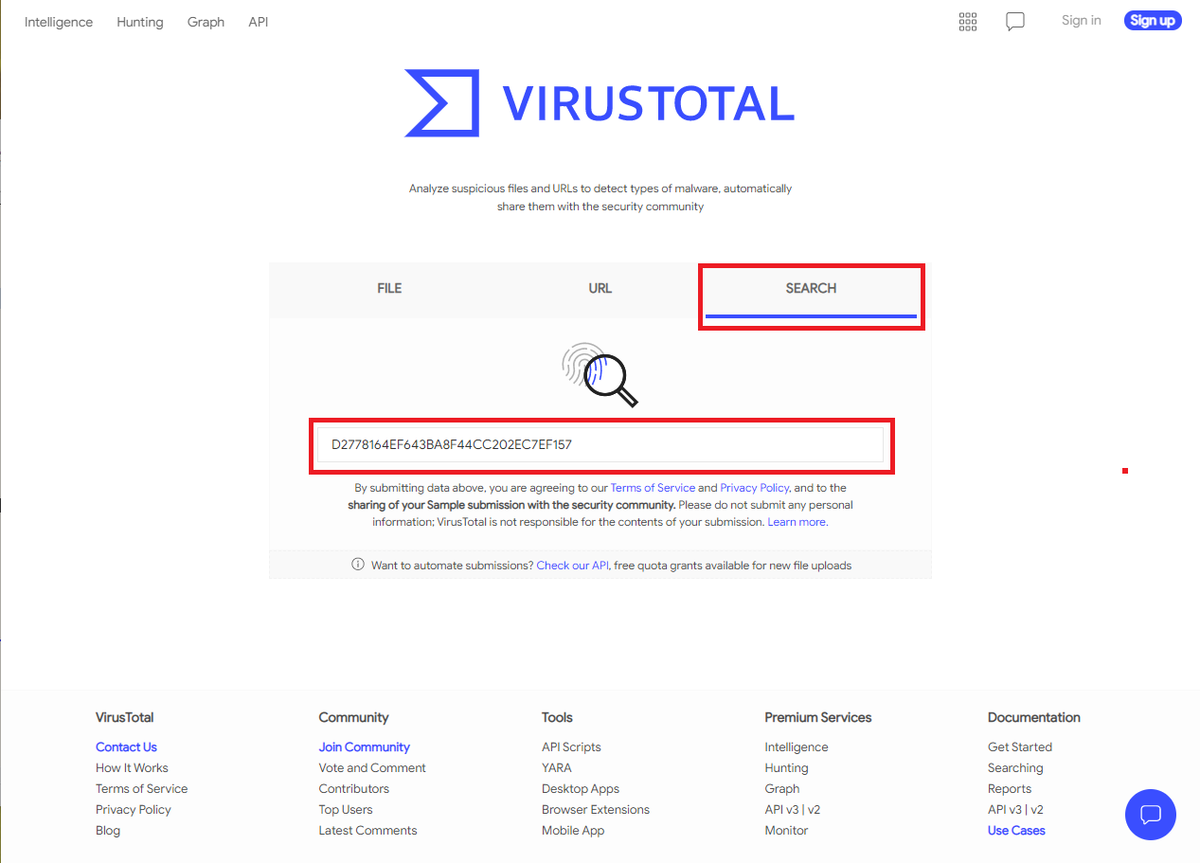
※ VirusTotalの有料会員になると、他の人がアップロードしたファイルをダウンロードすることができるらしいので、 会社の業務用データや個人情報などの機密情報の載ったファイルを決してアップロードしないでください。
Does Virustotal report this MD5 Checksum / file Netlogo.exe as malicious? (Yay/Nay)
Task7で取得したNetlogo.exeファイルのMD5の値をCopy&Pastして実行キーを押下します。
Does Virustotal report this MD5 Checksum / file vlc.exe as malicious? (Yay/Nay)
Task7で取得したvlc.exeファイルのMD5の値をCopy&Pastして実行キーを押下します。
Task 9 Identifying if the Executables are obfuscated / packed
There are a few provided tools on this Windows instance that are capable of identifying the compiler / packer of a file. However, PeID has a huge database and is a great tool for this.
このWindowsインスタンスには、ファイルのコンパイラ/パッカーを特定できる提供ツールがいくつかあります。しかし、PeIDは膨大なデータベースを持っており、このための素晴らしいツールとなっています。
Moreover, just because a file doesn't have the ".exe" extension, doesn't mean it isn't an actual executable! For instance, it can have the ".jpg" extension and still be an executable piece of code. This is a tad-bit out of scope for this room specifically, but essentially, files have identifying attributes within its hex - known as file headers.
さらに、拡張子が「.exe」ではないからといって、実際に実行可能でないとは限りません。例えば、拡張子が「.jpg」であっても、実行可能なコードの一部である可能性があります。これはこの部屋のテーマからは少し外れますが、基本的にファイルにはファイルヘッダーと呼ばれる識別属性があります。
E.g. The hex value for an executable is always "4D 5A". So if a file with a ".jpg" file has the hex header of "4D 5A", then it is obviously not a jpg file. You can read more into file headers / trailers here, which are great resources for data carving in file forensics / recovery.
例:実行ファイルの16進数の値は常に「4D 5A」です。ですから、もし「.jpg」のファイルの16進数のヘッダーが「4D 5A」であれば、それは明らかにjpgファイルではありません。ファイルフォレンジック/リカバリーでデータを切り分けるための素晴らしいリソースである、ファイルヘッダ/トレイラーについては、こちらで詳しく説明しています。
Provided Tools:
PeID Now using "PeID", identify the compiler / packer of the following two files in the Directory "Tasks/Task 9" to answer the questions.
それでは、「PeID」を使って、「Tasks/Task 9」ディレクトリにある以下の2つのファイルのコンパイラ/パッカーを特定し、質問に答えてください。
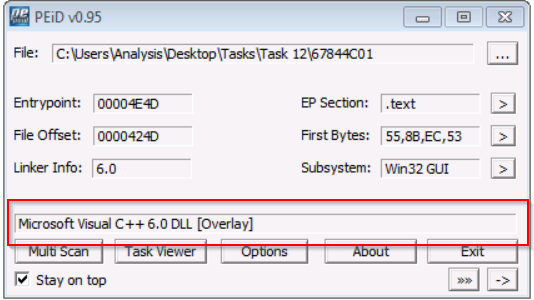
An example of using PEiD to identify the packer of a file. In this case, it is reported as "Microsoft Visual C++ 6.0"
PEiDを使ってファイルのパッカーを特定した例です。この例では、"Microsoft Visual C++ 6.0 "と報告されています。
What does PeID propose 1DE9176AD682FF.dll being packed with?
PeIDが提案する1DE9176AD682FF.dllは何でパックされているのですか?
RDP接続した画面のデスクトップ内にある[Tools]フォルダ-[Static]-[PE Tools]にあるPEiDのショートカットを起動します。

アプリケーションが起動したら、右上にある[...]ボタンを押下して、Task9フォルダ内にある「1DE9176AD682FF.dll」ファイルを選択します。

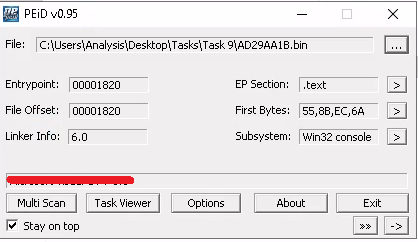
What does PeID propose AD29AA1B.bin being packed with?
Task9フォルダ内にある「AD29AA1B.bin」ファイルを選択します。
Task 10 What is Obfuscation / Packing?
Theory:
Packing is one form of obfuscation that malware Authors employ to prevent the analysis of programmes. There are both legitimate and malicious reasons as to why the Author of a program will want to prevent the decompiling of their program.
パッキングは、マルウェア作者がプログラムの解析を妨げるために用いる難読化の一形態です。プログラムの作成者が自分のプログラムの逆コンパイルを防止したいと考える理由には、正当なものと悪意のあるものがあります。
For example, a legitimate reason is the protection of intellectual property! Whilst I'm one for open-source as much as the next person here - alas not every organisation has the same mindset...but let's leave that aside.
例えば、正当な理由として、知的財産の保護があります。私もオープンソースには賛成ですが、残念ながらすべての組織が同じ考え方を持っているわけではありません...それはさておき。
In the same token, just because you write a program...Why should everyone have the right to "copy" your project? This is one of the justifiable reasons for obfuscation - it is yours at the end of the day!
同じ意味で、あなたがプログラムを書いたからといって、なぜ誰もがあなたのプロジェクトを「コピー」する権利を持つべきなのでしょうか?これが難読化の正当な理由のひとつです。つまり、最終的にはあなたのものなのです。
However, malware Authors employ obfuscation techniques such as packing - whilst for the same reasons, they do so with the intent to prevent people like us reversing it to understand its behaviours and ultimately with the aims of achieving infection.
しかし、マルウェアの作者は、同じ理由でパッキングなどの難読化技術を採用していますが、これは我々のような人間がその動作を理解するために反転させることを妨げ、最終的には感染させることを目的としています。
How packing works is out of scope for this room, but I hope to be able to delve into topics like these later on within THM, so that you can understand the theory behind the practical skills you'll be using.
この部屋では梱包の仕組みについては触れませんが、THMでは今後、このような話題を取り上げ、実践的なスキルの裏にある理論を理解できるようにしていきたいと考えています。
Practical:
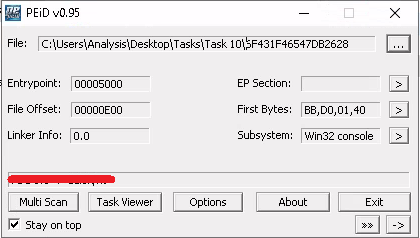
Your task is to identify whether or not the file "6F431F46547DB2628" located in the Directory of "Tasks\Task 10" is packed using the tool "PeID" akin to the task you just completed!
Tasks\Task 10 "のディレクトリにある "6F431F46547DB2628 "というファイルが、"PeID "というツールを使ってパックされているかどうかを、先ほどのタスクと同じように確認することです。
What packer does PeID report file "6F431F46547DB2628" to be packed with?
Task10フォルダ内にある「6F431F46547DB2628」ファイルを選択します。
Task 11 Visualising the Differences Between Packed & Non-Packed Code
This is another example of why PeID is a fantastic little tool. With its huge dataset of known packers, it is arguably one of the better ones at being able to fingerprint the names of packers / obfuscators within an application.
これは、PeIDがなぜ素晴らしい小さなツールであるかを示すもう一つの例です。既知のパッカーの膨大なデータセットにより、アプリケーション内のパッカーや難読化装置の名前をフィンガープリントできる優れたツールの一つであることは間違いありません。
Whilst this tool has a huge database, it doesn't have every packer out there! Especially say if an Author has written their own - PeID will have no way of identifying the packer used. In cases like this, it's more about what PeID doesn't tell us - rather than what it does.
このツールは膨大なデータベースを持っていますが、世の中にあるすべてのパッカーを網羅しているわけではありません。特に著者が自分で書いたものは、PeIDでは使用したパッカーを特定することができません。このようなケースでは、PeIDが教えてくれることよりも、教えてくれないことの方が重要なのです。
Practical:
You can try this yourself by navigating to directory "Tasks/Task 11" and dragging and dropping that file into PeID. What does it tell us?
自分で試してみるには、「Tasks/Task 11」ディレクトリに移動し、そのファイルをPeIDにドラッグ&ドロップしてみてください。これで何がわかるでしょうか?
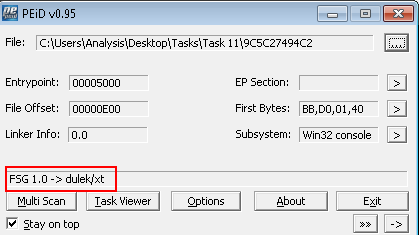
In this instance, PeID is able to detect what packer has been used to obfuscate the code. Whilst PeID is capable of detecting the possibility of packers being used, it is not able to automatically de-obfuscate them. This is a process we will have to do manually - at a later stage.
この例では、PeIDはコードを難読化するためにどのパッカーが使われたかを検出することができます。 PeIDは、パッカーが使用されている可能性を検知することはできますが、自動的に難読化を解除することはできません。これは、後から手動で行う必要があります。
After confirming that this file is indeed packed, let's open it up with a tool called IDA Freeware. This is located in the "Tools/Static/Disassembly" directory (or you can search for it through Windows Toolbar). Notice how there is a very minimal amount of information provided to us? For example, the "Imports" tab is practically empty! Little odd...right?
このファイルが確かにパックされていることを確認した後、IDAフリーウェアというツールで開いてみましょう。これは、「Tools/Static/Disassembly」ディレクトリにあります(または、Windowsのツールバーから検索できます)。非常に最小限の情報しか提供されていないことに気付きましたか?例えば、「Imports」タブにはほとんど何もありません。ちょっとおかしいですよね?
When opening the file, a few dialogue boxes may appear - its just IDA Freeware processing the file, it'll take a couple of seconds.
ファイルを開く際にいくつかのダイアログボックスが表示されることがありますが、これはIDA Freewareがファイルを処理しているだけで、数秒かかります。
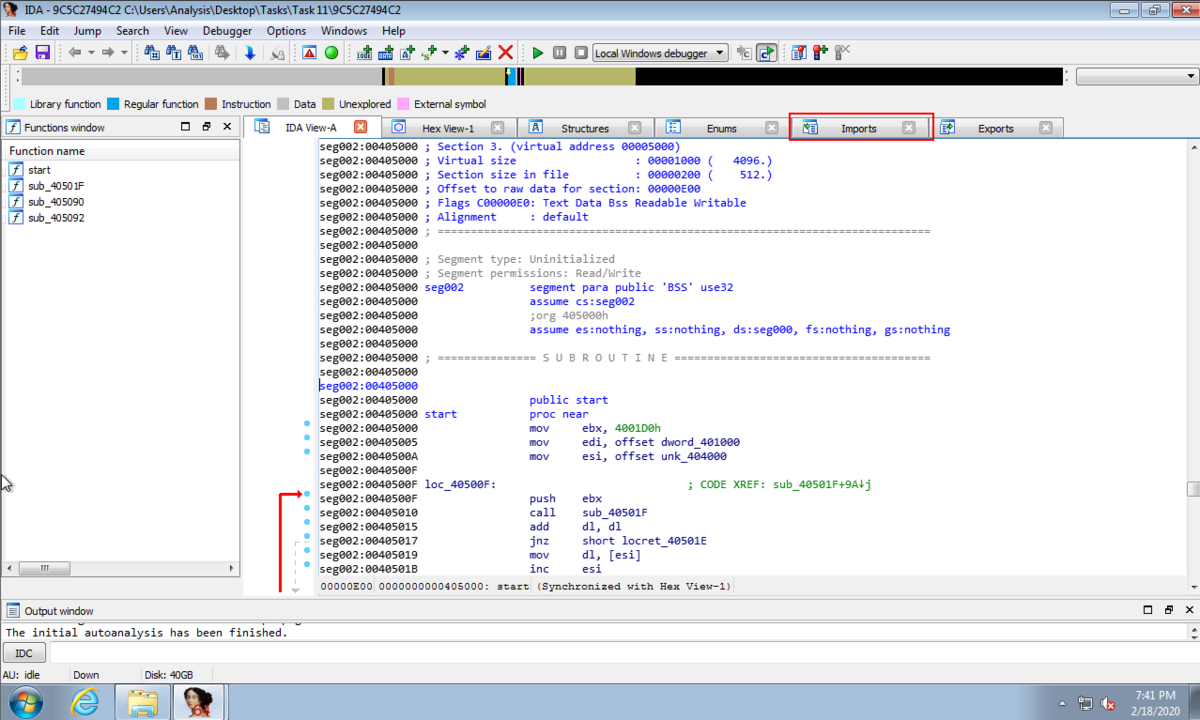


We can see there are only two "Imports" in this program! That's a bit bizarre...
このプログラムには、2つの "Import "しかないことがわかります。ちょっと異様ですね...。
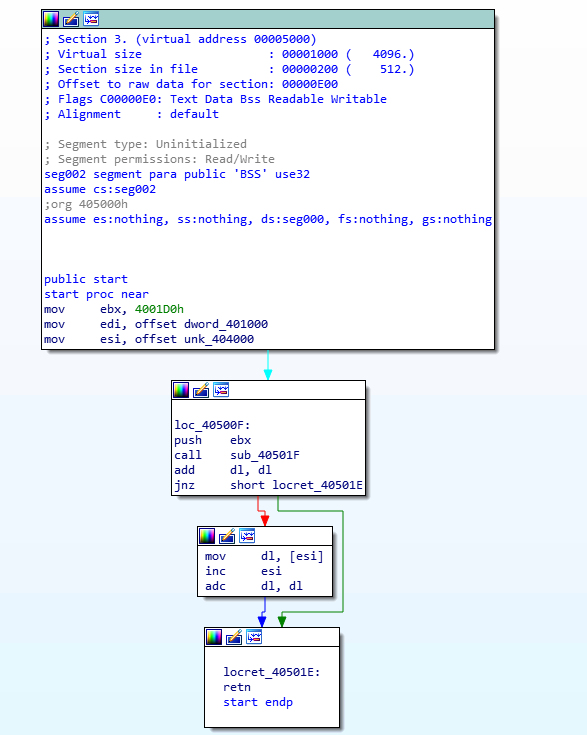
...The use of "IDA Free" will be developed upon as it is an advanced bit of kit. But essentially, we can see the flow of how the program executes - indicated by the arrows. The problem? There's very little here! There are a few more characteristics that indicate its packed, but this is also beyond the scope for this room.
...IDA Freeは高度なキットなので、その使い方はこれからです。しかし、基本的には、プログラムの実行の流れは矢印で示されています。問題は?ここにはほとんど何もありません。この他にも、パックされていることを示す特徴がいくつかあるのですが、これもこの部屋の範囲を超えています。
Whereas, if we were to open a file that isn't obfuscated, we should expect to see a much larger import count and graph/flowchart, like this:
一方、難読化されていないファイルを開いた場合は、もっと大きなインポート数と、以下のようなグラフ/フローチャートを見ることができるはずです。
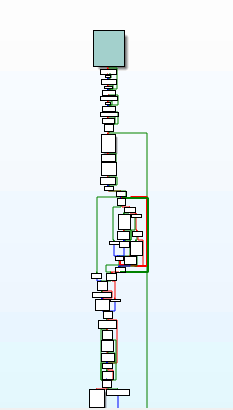
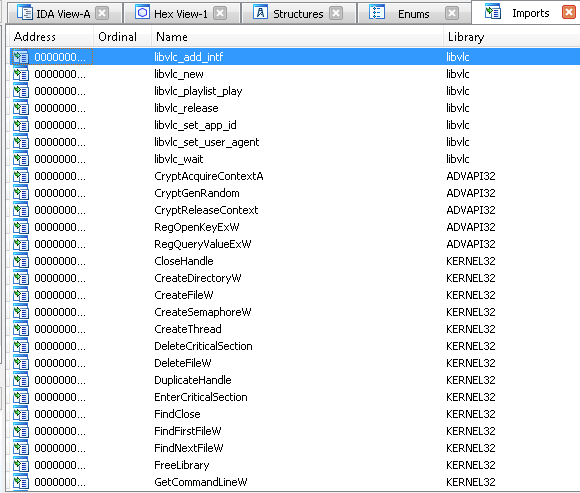
See how there's so much more information here? Obfuscated code is much harder to analyze at least at the static level, as we're presented with very little information!
ここにはたくさんの情報があるのがわかりますか?難読化されたコードは、少なくとも静的なレベルでは、情報がほとんど与えられないため、解析が非常に難しくなります
Cursed obfuscation!
呪われた難解さ!
Task 12 Introduction to Strings
Theory:
"Strings" are essentially the ASCII / Text contents of a program...this could be anything from passwords for self-extracting zips, to bitcoin addresses in ransomware samples.
"文字列 "とは、基本的にプログラムのASCII/Textコンテンツのことで、自己解凍型ZIPのパスワードやランサムウェアのサンプルに含まれるビットコインのアドレスなどが該当します。
Such as that in the example above, when analysing the contents of these strings, we can sometimes paint a fairly indicative picture of the behaviours of the programme - bitcoin wallets being used in ransomware.
上記の例のように、これらの文字列の内容を分析すると、ランサムウェアに使用されているビットコインウォレットというプログラムの動作をかなり示唆することができます。
Task:
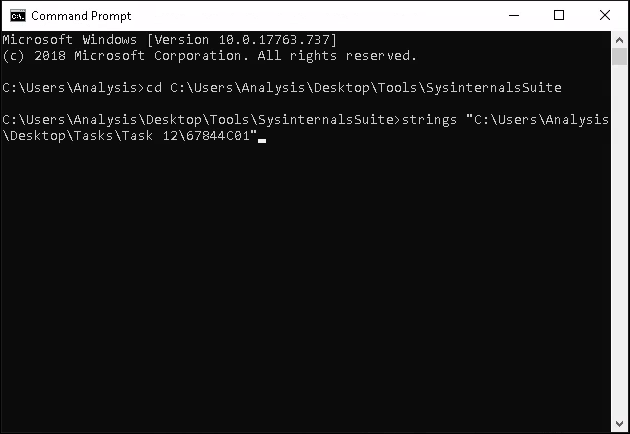
Open a Command prompt on the Windows Machine and navigate to the directory "Tools\Sysinternalssuite"
Windowsマシン上でコマンドプロンプトを開き、"Tools\Sysinternalssuite "ディレクトリに移動します。
cd C:\Users\Analysis\Desktop\Tools\SysinternalsSuite
Keep this terminal open.
We're going to use Microsoft's Sysinternals "Strings" program to output the retained strings within the specified file in "Task 12". We can do this by:
「タスク12」では、MicrosoftのSysinternals「Strings」プログラムを使って、指定したファイル内の保持されている文字列を出力することにします。
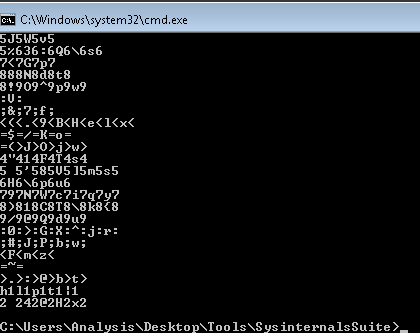
strings "C:\Users\Analysis\Desktop\Tasks\Task 12\67844C01"
Task 12にある「67844C01」ファイルを「Strings」アプリケーションにドラック&ドロップします。
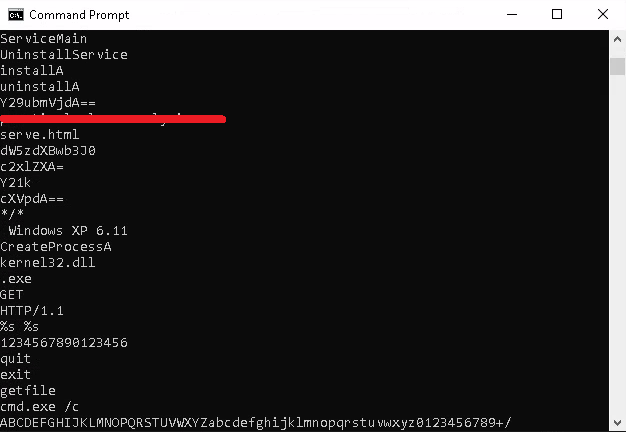
You will receive a whole load of text, most of it looks like nonsense...But there is some text in there that is valuable. Scroll up!
大量のテキストが送られてきますが、そのほとんどはナンセンスに見えます...しかし、その中には価値のあるテキストもあります。スクロールしてみてください。
Proceed to answering Question 1.
質問1の回答に進む。
You'll find that programs often contain large amount of strings and using the "strings" tool from sysinternals may only display 10% of these...
プログラムには大量の文字列が含まれていることが多く、sysinternalsの "strings "ツールを使っても、そのうちの10%しか表示されないことがあります。
...That and it's not exactly practical scrolling up through a terminal for stuff like this - we are on Windows afterall! There's a GUI tool for that.
...それに、ターミナルをスクロールしてこのようなことをするのは正確には実用的ではありません - 私たちは結局、Windowsにいるのですから。そのためのGUIツールがあります。
Launch the application within "Tools/Static/PE Tools/PE Explorer" and drag and drop the same file "67844C01" from the previous question into the application.
「Tools/Static/PE Tools/PE Explorer」内のアプリケーションを起動し、前問の同じファイル「67844C01」をアプリケーションにドラッグ&ドロップします。
Where you will be presented with the following, indicating that it has successfully imported:
ここでは、インポートに成功したことを示す次のような画面が表示されます。
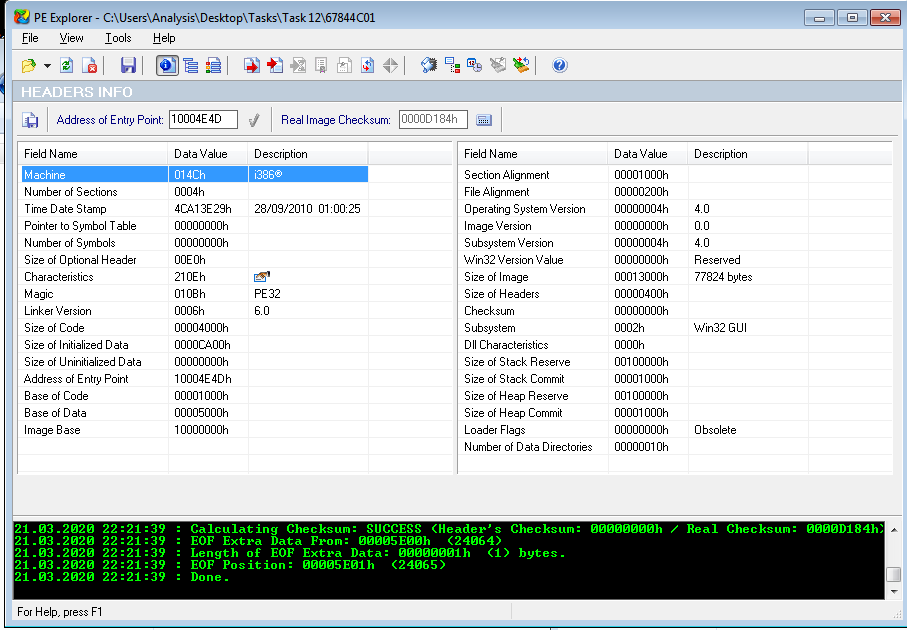
After import. Navigate to "View -> Imports"
インポート後 "表示→インポート "に移動する
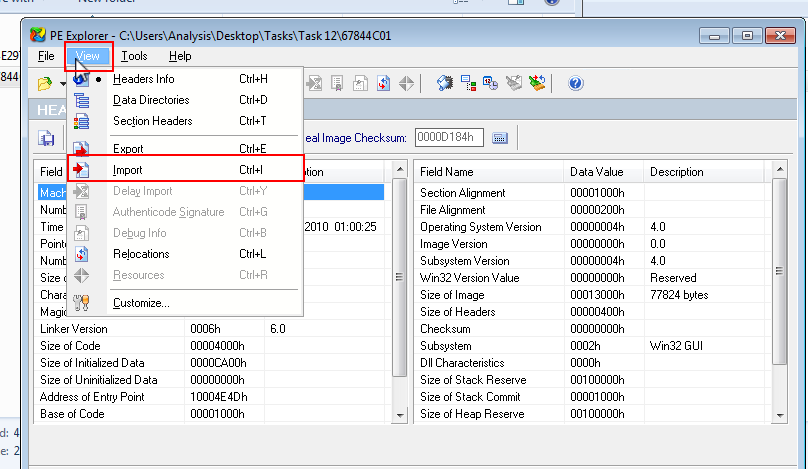
You can now answer Question #2!
これで質問2に答えられますね。
What is the URL that is outputted after using "strings"
"strings "を使用した後に出力されるURLは?
「cd C:\Users\Analysis\Desktop\Tools\SysinternalsSuite」ディレクトリに移動します。
「strings C:\Users\Analysis\Desktop\Tasks\Task 12\67844C01」 を実行後、出力結果をスクロールするとURLが出力されています。
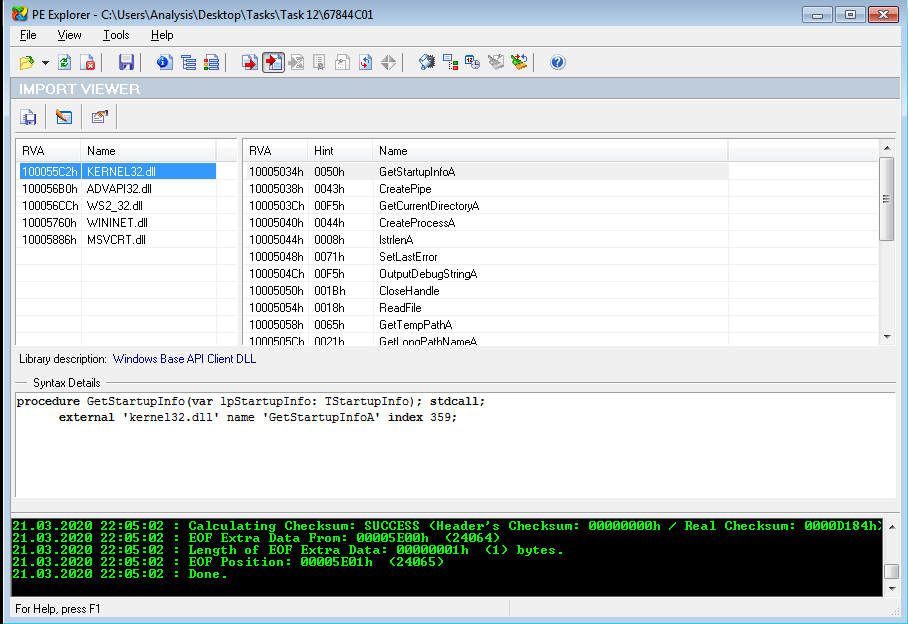
How many unique "Imports" are there?
個性的な "インポート "はどれくらいあるのでしょうか?
答えは「You can now answer Question #2!」の前の画像にありますね。
Task 13 Introduction to Imports
Theory:
The classification of IDA Freeware is arguable as the tool can be used for both static and dynamic analysis. Without going too in-depth regarding the differences, there are two classifications of tools like IDA Freeware:
IDAフリーウェアは、静的解析と動的解析の両方に使用できるツールであるため、その分類は議論の余地がある。その違いについてはあまり深く言及しないが、IDAフリーウェアのようなツールには2つの分類がある。
- Disassemblers (逆アセンブラ)
- Debuggers (デバッガ)
I'll allow you to explore the differences between these two types of tools and their use cases in your own time, but for contextual sake - Disassemblers reverse the compiled code of a program from machine code to human-readable instructions (assembly). This is limited to how the program represents itself in its current state! I.e. If the contents of an executable changes during execution - "Disassemblers" will not reflect this.
この2種類のツールの違いや使用例については各自で調べていただきたいのですが、文脈的には - 逆アセンブラは、コンパイルされたプログラムのコードを機械語のコードから人間が読める命令(アセンブリ)へと逆変換します。これは、プログラムが現在の状態で自分自身をどのように表現しているかに限定されます。つまり、実行ファイルの内容が実行中に変更された場合、「ディスアセンブラ」はこれを反映しません。
Whilst Debuggers deploy the same techniques used by "Disassemblers", "Debuggers" essentially facilitate execution of the program - where the analyser can view the changes made throughout each "step" of the program. These tools are great because a true picture of the program presents itself. However, if it is indeed malicious, you have now infected yourself.
デバッガーは「ディスアセンブラ」と同じ技術を使用していますが、「デバッガー」は基本的にプログラムの実行を容易にし、分析者はプログラムの各「ステップ」で行われた変更を見ることができます。これらのツールは、プログラムの真の姿を見せてくれるので素晴らしいものです。しかし、それが本当に悪意のあるものであれば、あなた自身が感染していることになります。
With enough understanding, an analyser can introduce "breakpoints" (or pauses) at various stages of a program, where the program will execute up until a breakpoint. For example, sticking with the idea of Ransomware, an analyser can create a "breakpoint" within the application prior to the actual stage of encryption of files. This facilitates an analyser to view the various changes of a program during execution (such as unpacking or connecting to a remote server such as that in a botnet) up until the point of malicious infection.
十分な理解があれば、アナライザーはプログラムの様々な段階に「ブレークポイント」(または一時停止)を導入することができ、ブレークポイントまでプログラムが実行されます。例えば、ランサムウェアを例に挙げると、アナライザーは、ファイルを暗号化する実際の段階の前に、アプリケーション内に「ブレークポイント」を設けることができます。これにより、分析者は、悪意のある感染までの実行中のプログラムの様々な変化(解凍やボットネット内のようなリモートサーバーへの接続など)を確認することができます。
Practical:
For this room, we will be using IDA Freeware within the context of statistical analysis. I'll walkthrough how to import an executable into IDA Freeware below.
この部屋では、統計解析の文脈でIDA Freewareを使ってみます。以下、IDA Freewareに実行ファイルをインポートする方法を説明します。
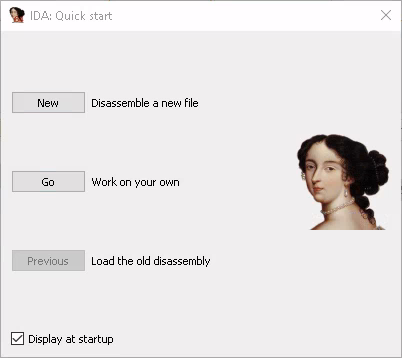
- Lets launch "IDA Freeware" and select the file to import, in this case we'll be using "uninstall.exe"
「C:\Users\Analysis\Desktop\Tools\Static\Disassembley」へ移動し、「IDA Freeware」を起動します。
And navigate to the file...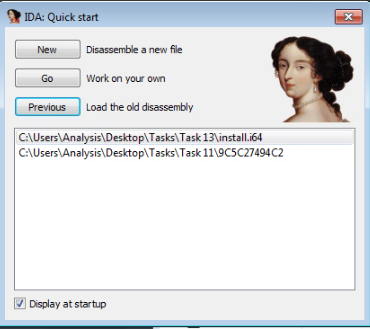
そして、そのファイルにナビゲートする...
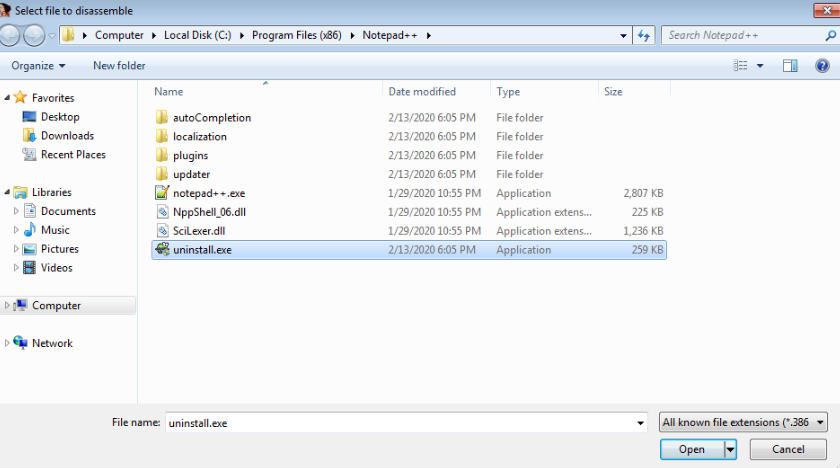
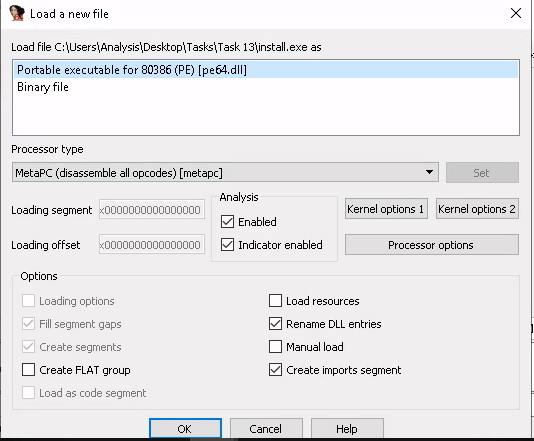
- Since we know it is an executable file, we select "Portable executable for 80386 (PE) [pe64.dll]"
実行ファイルであることがわかっているので、"Portable executable for 80386 (PE) [pe64.dll]"を選択します。

- After pressing "OK" the application will load. Allow a few minutes for the executable to be decompiled.
OK "を押すと、アプリケーションがロードされます。実行ファイルが逆コンパイルされるまで数分かかります。
There are various tabs, similar to what we saw in "PE Explorer" i.e. "Imports" and "Exports".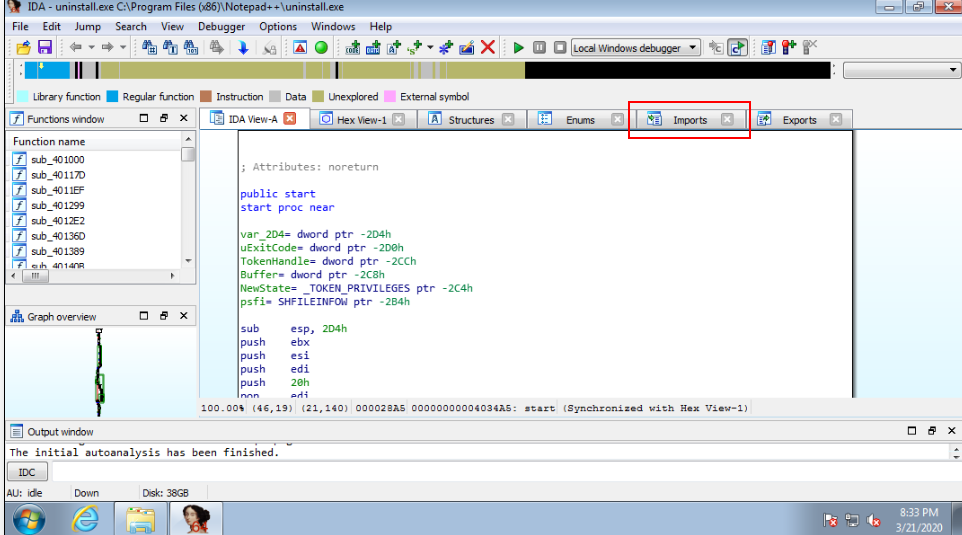
「PE Explorer」で見たのと同じように、「Imports」と「Export」という様々なタブがあります。
Task:
Navigate to the directory "Tasks/Task 13" and open "install.exe" with IDA Freeware, just like we did in the example above. Again, this may take a few seconds to a couple of minutes to compute dependant upon the size of the application. For this task expect roughly ~20 seconds.
「Tasks/Task 13」ディレクトリに移動し、上記の例で行ったのと同様に、IDA Freewareで「install.exe」を開きます。アプリケーションのサイズによっては、計算に数秒から数分かかる場合があります。このタスクでは、およそ20秒程度を見込んでいます。
You can now answer the question below:
以下の質問に答えてください。
How many references are there to the library "msi" in the "Imports" tab of IDA Freeware for "install.exe"
IDA Freewareの "Imports "タブにある "install.exe "のライブラリ "msi "への参照数はいくつですか?
表示された画面から[go]ボタンを押下します。
[File]-[Open]から「C:\Users\Analysis\Desktop\Tasks\Task 13\import.exe」ファイルを選択します。
「Load a new file」画面が表示されるので、「Portable executable for 80386(PE) [pe64.dll]」を選択した状態で[OK]ボタンを押下します。
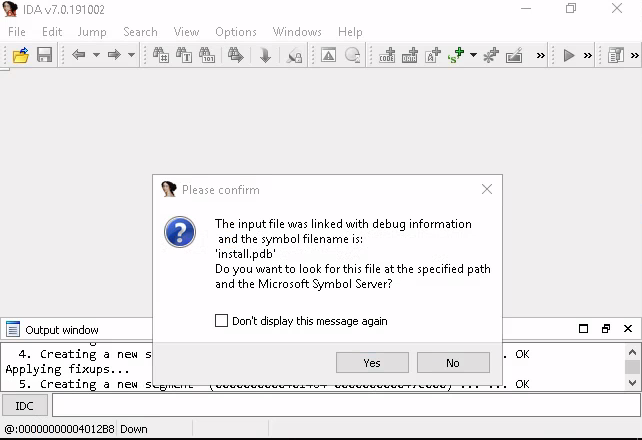
表示された画面で[Yes]ボタンを押下します。
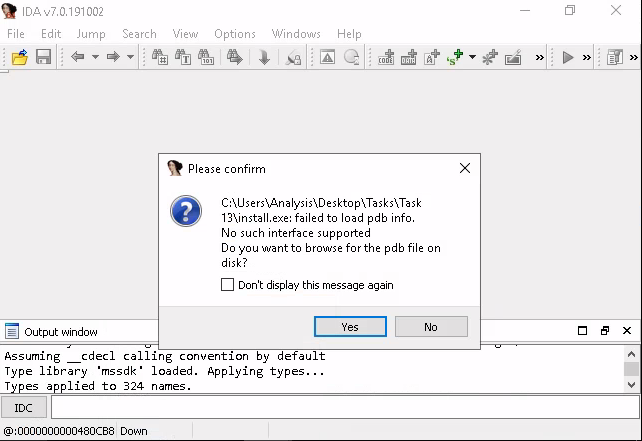
続く画面でも[Yes]ボタンを押下します。
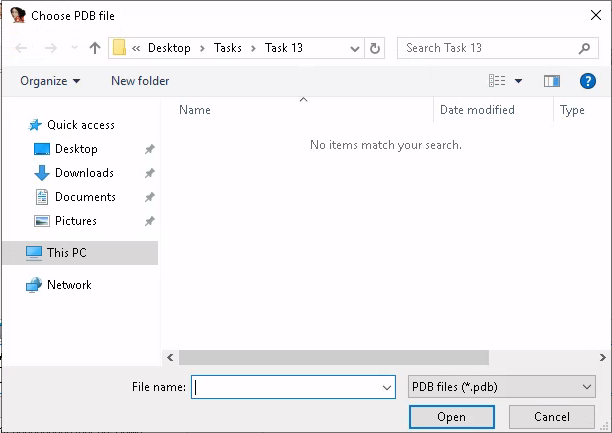
「Choose PDB file」画面が表示されるので、[cancel]ボタンを押下します。
表示された画面の[import]タブを表示して、「library」列にある「msi」と表示されている行をカウントします。

Task 14 Practical Summary
I'm not going to walk you through this one, but you have done all the necessary steps above to achieve this. GL HF :^
私はこの件について説明するつもりはありませんが、あなたはそのために必要な上記のステップをすべて行っています。GL HF :^。
If you struggle, revisit the techniques you used above. Moreover, if you're still stuck, visit the TryHackMe Discord!
もし苦戦したら、上記で使ったテクニックをもう一度見直してみてください。さらに、まだ行き詰まったら、TryHackMe Discordにアクセスしてみてください。
The file specified for analysis is "ComplexCalculator.exe" in the Directory "Tasks/Task 14". I'll leave it up to you to figure out what tool(s) out of what we've used above is best!
解析用に指定したファイルは、「Tasks/Task 14」ディレクトリ内の「ComplexCalculator.exe」です。以上のようなツールの中で、どのツールが最適なのかは、皆さんのご判断にお任せします。
What is the MD5 Checksum of the file?
ファイルのMD5 Checksumは何ですか?
「Tasks/Task 14」ディレクトリ内の「ComplexCalculator.exe」ファイルにカーソルを合わせて[右クリック]-[プロパティ]を選択します。
そのあと「File Haches」タブをクリックします。
タブの真ん中あたりにある「Setting」をクリックします。 「HachTab Settings」画面上にある「MD5」にチェックを入れて[OK]ボタンを押下します。
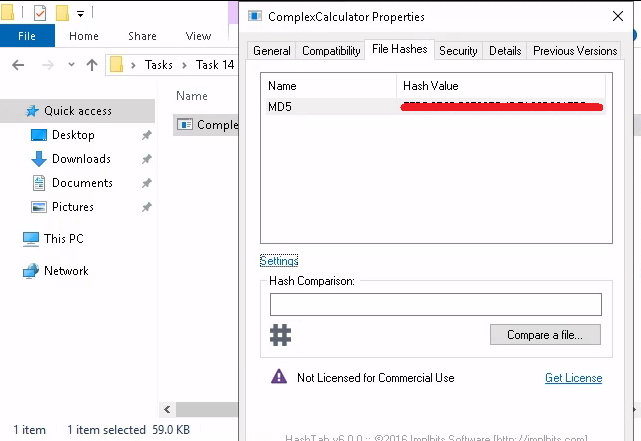
Does Virustotal report this file as malicious? (Yay/Nay)
Virustotalはこのファイルを悪意のあるものとして報告していますか?(Yay/Nay)
ローカルのPCに戻り、ブラウザで「Virustotal」のサイトにアクセスします。
先ほどのハッシュ値を貼り付けると結果が出ます。
Ans) Yay
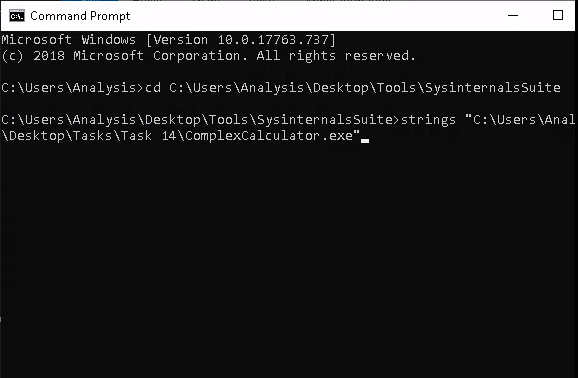
Output the strings using Sysinternals "strings" tool.
Sysinternals社の "strings "ツールを使って文字列を出力します。
What is the last string outputted?
最後に出力された文字列は何ですか?
Windowsマシン上でコマンドプロンプトを開き、
「cd C:\Users\Analysis\Desktop\Tools\SysinternalsSuite」ディレクトリに移動します。
「strings C:\Users\Analysis\Desktop\Tasks\Task 14\ComplexCalculator.exe」 を実行後、文字列が出力されます。
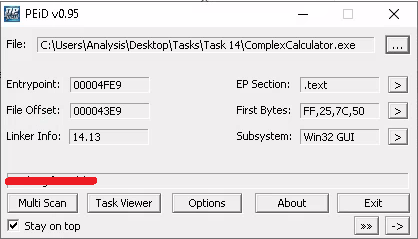
What is the output of PeID when trying to detect what packer is used by the file?
ファイルで使用されているパッカーを検出しようとしたときのPeIDの出力は?
RDP接続した画面のデスクトップ内にある[Tools]フォルダ-[Static]-[PE Tools]にあるPEiDのショートカットを起動します。
アプリケーションが起動したら、右上にある[...]ボタンを押下して、Task14フォルダ内にある「ComplexCalculator.exe」ファイルを選択します。
完了!
かなり長かった...